


Developing an Immediate Mode GUI
When working on prototypes, I find that having any sort of UI system is an absolute necessity for iteration speed. Once I finally started working on it, I develoepd two rough prototypes. The way I usually go about this is: the first iteration of a project is always a naeve implementation to get something working as fast as possible. Very little research goes into it and my goal is just to make it happen. See what works, what doesn't, what are the hard problems that I'm solving. The second iteration - still in prototype space - is more thoughful, has more research behind it and very obviously tries to improve on the first one.
For this UI system, I did the same thing. My main idea was simple.
- Draw a quad on the screen.
- Trivially check if the cursor was inside.
- Emit events based on what kind of widget this quad represents.
For this approach, every widget is built fron the ground up. Every widget has very specific contained logic, which has to be
re-implemented to every other widget, even if functionality is similar. Take my ui_button and ui_checkbox widget for example:
ui_button(text)
{
  Acquire next rect for button
  Check if mouse is over → highlight → change cursor
  If mouse down → darken
  If mouse clicked → mark clicked
  Lerp color toward target
  Draw button quad
  Draw text centered
  Return if clicked
}
ui_checkbox(text, checkbox)
{
Acquire next rect for checkbox + label
Check if mouse is over → highlight → change cursor
If clicked → toggle checkbox
Draw small box
If checked → draw X mark
Draw text beside box
}That's a lot of logic for one widget - logic that has to be duplicated for all widgets I want to implement from now on.
Now, I don't have any inherent problem with duplicating code - but the problem is with scale. The more widgets I add and the more functionality I need to support the bigger the problem becomes. For example, if I want to add keyboard navigation to my UI system, I would have to go and modify every single widget to support it.
After this point, I felt like I had enough of a rough idea of what the problem was. How the global context for the ui module should look like, how the cross frame persistance would look like, how input handling would be done, how rendering would be handled... And so I decided to go onto my second iteration.
Separating builder code from widgetsAfter some research, I found a very helpful project - raddbg - that implements a UI system that solves the main problem I had. The main idea is that there is a separation of concerns when it comes to building widgets and implementing logic. Implementing widgets should be a task more akin to scripting than programming. You just create nodes, define their properties and attach functionality to them, while the bulk of the implementation is on building the node itself.
With this idea in mind, I started working on my second iteration of the UI system. The main idea is that every node is a quad with some optional text, and every node has functionality that can be attached to it. Building widgets becomes almost a scripting task - you just create nodes and attach functionality to them. The hard part is implementing the nodes themselves, but once they are implemented, building complex UIs becomes trivial.
The UI Tree
To begin with, we need a global context for the UI module that handles all of underlying logic and state management.
The most important thing we'll keep here is the UI_Node* root node. This node is the root of the UI tree and contains all other nodes as children.
And now we need a UI_Node. This is the main structure we will use to build the UI system. From now on, I use this structure
as the building block for all widgets. Every widget is just a collection of nodes with some attached functionality, so the bulk of the implementation
will be in building each node. A node structure would look something like this:
typedef struct UI_Node UI_Node;
struct UI_Node
{
// Node tree
UI_Node* first; /* First child */
UI_Node* last; /* Last child */
UI_Node* next; /* Next child, after current node */
UI_Node* previous; /* Previous child, before current node */
UI_Node* parent; /* Parent of current node */
u64 hash;
// Node Settings
Rectf32 bounds; /* Container rectangle drawing bounds - Absolute values */
Rectf32 clip; /* Clipping rectangle for children - Absolute values */
Vec2f32 cursor; /* Next position to draw - Relative to node->clip */
...
f32 depth; /* Keeps track of that's in front. Smaller number means closer to the camera. 1 is root */
UI_Node_Flags flags; /* Behaviour for this node */
Vec2f32 local_drag_offset; /* How much it was offseted this frame */
// Style
...
// String stuff
String8 string;
...
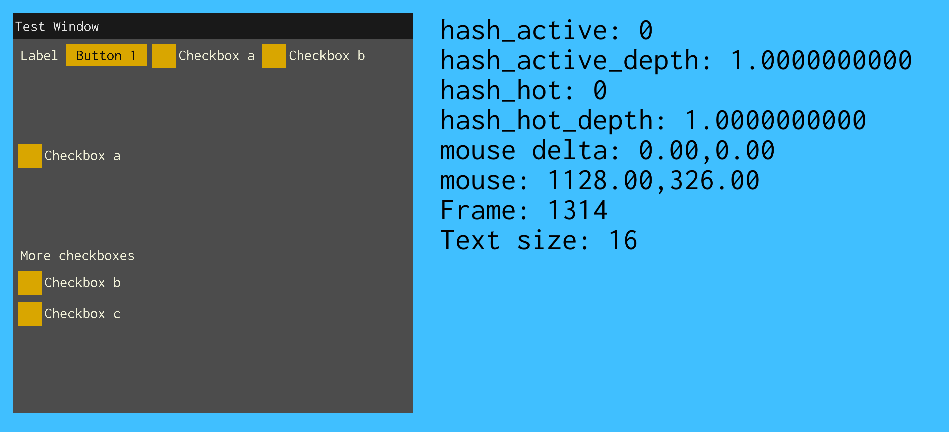
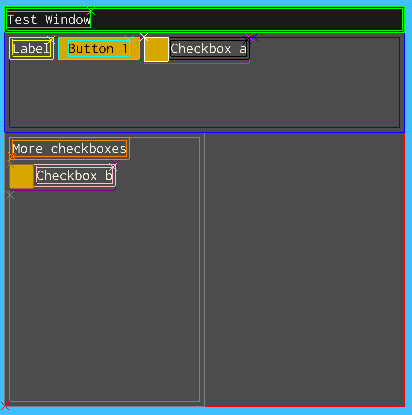
};With this structure, we can build a tree of nodes that represent the UI. As an example, take a look at this window (debug boundaries are turned on for clarity):
At the end of the frame, we would have a UI tree that looks somehting like this:
graph TD
  root["__root__"]
  root --> win["Test Window"]
  win --> title["title_bar"]
  win --> row["##layout_x"]
  row --> label["Label"]
  row --> btn["Button 1"]
  row --> cbA_row["##Checkbox a"]
  cbA_row --> cbA["Checkbox a"]
  cbA_row --> cbA_lbl["Checkbox a"]
  win --> col["##layout_y"]
  col --> more["More checkboxes"]
  col --> cbB_row["##Checkbox b"]
  cbB_row --> cbB["Checkbox b"]
  cbB_row --> cbB_lbl["Checkbox b"]
Here you can already see the structure that the UI tree will have and how some more complex nodes are structured. For example, note the "Test Window" widget. The titlebar it's own node, essentially a child of the window, though it acts as if it belongs to the same widget. Buttons are just one node since they essentially are a quad with some text. Checkboxes are two nodes - one for the box and one for the label. And that's the rough idea for this tree structure.
Building each nodeWith this structure in mind, we can start building each node. The main idea is that every node is a quad with some optional text, and every node has functionality that can be attached to it. This functionality is attached through flags at createion time. For example:
typedef u32 UI_Node_Flags;
enum
{
  UI_Node_Flags_Mouse_Clickable = (1 << 0), /* Makes this node emit a signal when clicked */
  UI_Node_Flags_Draggable = (1 << 1), /* Makes this node emit a signal when dragged */
  UI_Node_Flags_Hoverable = (1 << 2), /* Makes this node emit a signal when hovered */
  UI_Node_Flags_Text_Display = (1 << 3), /* The UI_Node will display the text on the cursor's position and skip the cursor relative to UI_Alignment_Kind */
  UI_Node_Flags_Text_Center_X = (1 << 4), /* If text is displayed, centers the text horizontally in the node */
  UI_Node_Flags_Text_Center_Y = (1 << 5), /* If text is displayed, centers the text vertically in the node */
  UI_Node_Flags_Size_Wrap_Around_Text = (1 << 6), /* Wraps the size of the node around the text with. If fixed size is provided, it is used as padding. */
  UI_Node_Flags_Resize_X = (1 << 7), /* Node can be resized on X axis */
  UI_Node_Flags_Resize_Y = (1 << 8), /* Node can be resized on Y axis */
};
These are some of the behaviour flags you would want to add to a node. Now let's say we're creating a button widget. All we have to do would have to be something like this:
UI_Node_Flags button_flags =  UI_Node_Flags_Mouse_Clickable |
                              UI_Node_Flags_Hoverable       |
                              UI_Node_Flags_Text_Display    |
                              UI_Node_Flags_Text_Center_Y   |
                              UI_Node_Flags_Text_Center_X   |
                              UI_Node_Flags_Size_Wrap_Around_Text;
ui_node_from_string(text, button_flags);
As you can see here, these flags are attached to the node when created. The resulting node will implement this functionality.
It becomes almost as if we're configuring a widget, rather than creating one.
Then inside ui_node_from_string is where we implement the bulk of the logic.
A very simplified way of thinking about what this function is doing can be thought of as this:
function UI_Node*
ui_node_from_string(String8 string, UI_Node_Flags flags)
{
  ...

  UI_Node* parent = ui_stack_parent_top(); // Grab the parent node from the stack
  UI_Node* node = push_array(ui_context.frame_arena, UI_Node, 1); // Allocate this node

  // Build the current node
  node->hash              = parent->hash ^ string8_hash(string);
  node->depth             = (node != ui_context.root) ? (parent->depth - F32_EPSILON) : 1.0f;
  node->string            = string8_copy(ui_context.frame_arena, string);
  node->...

  // String config
  if (HasFlags(node->flags, UI_Node_Flags_Text_Display))
  {
    // Prepare for text drawing
    if (HasFlags(node->flags, UI_Node_Flags_Text_Center_Y))
    {
      // We align the string vertically
    }
    if (HasFlags(node->flags, UI_Node_Flags_Text_Center_X))
    {
      // We align the string horizontally
    }
  }

  ...

  // Selecting the correct node
  if (ui_is_mouse_in_node(node))
  {
    if (node->depth < ui_context.hash_hot_depth)
    {
      ui_context.hash_hot       = node->hash;
      ui_context.hash_hot_depth = node->depth;
      if (input_is_button_clicked(&g_input, Mouse_Button_Left))
      {
        ui_context.hash_active       = node->hash;
        ui_context.hash_active_depth = node->depth;
      }
    }
  }
  if (input_is_button_up(&g_input, Mouse_Button_Left) && input_was_button_down(&g_input, Mouse_Button_Left))
  {
    ui_context.hash_active = 0;
    ui_context.hash_active_depth = 1.0f;
  }

  // Dragging
  if (ui_context.hash_active == node->hash)
  {
    if (HasFlags(node->flags, UI_Node_Flags_Draggable))
    {
      node->local_drag_offset = g_input.mouse_current.delta;
    }
  }

  return node;
}
This way, the node builds itself based on the flags provided. In this system, there is no such thing as a button for example, only a node that is clickable, hoverable... etc.
Using stacks for configurabilityAnother important aspect of this system is configurability. Every node has a set of properties that define its behaviour and appearance. We want some of these properties to propagate down the tree, so that child nodes can inherit properties from their parents. This is achieved by having stacks for each property that we want to propagate. For example, we can have a stack for the position of the next node:
typedef struct UI_Context UI_Context;
      struct UI_Context
      {
        ...

        struct UI_Parent_stack
        {
          UI_Node* data[MAX_CONFIG_STACKS];
          u32 top_index;
          UI_Node* bottom_val;
        } parent_stack;
      };
Naturally, everytime we create a new widget, we want to place it somewhere. This way, we can push the position onto the stack and the context will use the top of the stack as the position for the next widget. One cool way I found in the source code of raddebugger to do this is through a set of macros that define the start and end of a widget. For example:
#define ui_top_left(val) DeferLoop(ui_stack_top_left_push(val), ui_stack_top_left_pop())val, and when the scope ends, the previous value is restored. So say you want to create a button in a specific position:
ui_top_left(vec2f32(200,200))
        {
          ui_button(S("Test Window"));
        }
This way, internally, vec2f32(200,200) is pushed onto the stack, then when ui_node_from_string(...) is called, it builds the node and it's position by peeking at the top of the top_left stack, and assigning that value to the node's position. When the scope of the Defer macro ends, the value is poped from the stack. By the end of the frame, to check for bugs, I like to check if all stacks are at the bottom - meaning all of them were poped correctly.
One worry about this approach is scaling the amount of configurability. Inevitably, this will lead to a huge amount of stacks. While this is obviously achievable, it's mostly boiler plate. To deal with this, I use my code generator - Hephaestus - to generate all of the stack code for me, putting them in a macro, and I just have to call that macro insitde the UI_Context strucutre. This way I don't have to write it by hand.
Immediate mode but cross frame persistanceOne problem that we now face is that, if we want to move a node around, we will always have the same position on the stack. By design, we don't want the user to have to manage node positions. We just require the initial position. While this is a immediate mode UI system, we still cannot get around the fact we need to store some state between frames.
Because we hash every node's string, we can use this hash as a unique identifier for the node. The cache structure only requires the hash and whatever attributes we need to persist between frames, not the full UI_Node. In my case, it looks something like this:
typedef struct UI_Node_Cache UI_Node_Cache;
struct UI_Node_Cache
{
  u64 hash;
  ...
}
This then can be stored in a hash table, where every frame we look for the node's hash in the table. To solve this positioning problem, we can store an offset position (which is the mouse cursor delta we collected while clicking on a draggable node) in the cache, that way, when we create the node again next frame, we can just add this offset to the initial position to get the new position. This way the stack has a static reference value provided by the user, and the cache provides the dynamic offset value that we collect while interacting with the node.
Cross frame transitionsThis is also usefull for transitions for example. I like to have some smooth color transitions when clicking or hovering nodes. We can achieve this in the same way by storing a linear interpolation factor in the cache that we update every frame based on the node's state (hovered, clicked... etc).
typedef struct UI_Node_Cache UI_Node_Cache;
struct UI_Node_Cache
{
  u64 hash;
  Vec2f32 accumulated_drag_offset; /* How much it has been offseted in total */
  f32 hover_t;
  f32 active_t;
};
And then we can interpolate between the colors - by a given speed - based on these values:
// Hover
if (HasFlags(node->flags, UI_Node_Flags_Hoverable))
{
  if (ui_context.hash_hot == node->hash)
  {
    cached_node->hover_t = Clamp(cached_node->hover_t + g_delta_time * ui_context.animation_speed, 0, 1);
  }
  else
  {
    cached_node->hover_t = Clamp(cached_node->hover_t - g_delta_time * ui_context.animation_speed, 0, 1);
  }
}

// Active
if (HasFlags(node->flags, UI_Node_Flags_Mouse_Clickable))
{
  if (ui_context.hash_active == node->hash)
  {
    cached_node->active_t = Clamp(cached_node->active_t + g_delta_time * ui_context.animation_speed, 0, 1);
  }
  else
  {
    cached_node->active_t = Clamp(cached_node->active_t - g_delta_time * ui_context.animation_speed, 0, 1);
  }
}
The result would look something like this:
Building each widget
With this setup, building each widget becomes a matter of creating nodes with the correct flags and properties. Take the full button implementation for example:
function UI_Signal
ui_button(String8 text)
{
  UI_Signal button_signal = (UI_Signal){0};
  {
    ui_node_color_scheme(ui_context.color_scheme.button)
    ui_child_layout_kind(UI_Alignment_Kind_X)
    ui_padding_fixed(0)
    ui_size_fixed(20, ui_context.text_pixel_height - ui_context.default_widget_height)
    {
      UI_Node_Flags button_flags = UI_Node_Flags_Mouse_Clickable |
                                   UI_Node_Flags_Hoverable       |
                                   UI_Node_Flags_Text_Display    |
                                   UI_Node_Flags_Text_Center_Y   |
                                   UI_Node_Flags_Text_Center_X   |
                                   UI_Node_Flags_Size_Wrap_Around_Text;
      button_signal.node  = ui_node_from_string(text, button_flags);
      ui_fill_signals_from_node(&button_signal);
    }
  }
  return button_signal;
}
Creating a button is a matter of setting up some configuration (color scheme, layout kind, padding, size) and then assigning the expected behaviour flags. You can have more complex widgets, such as a window for example, which would be a collection of nodes with specific behaviour. In order for the child nodes to inherit properties from the window node, the window cannot just be one function call. We have to define a begin and end function:
function void
ui_window_begin(String8 text)
{
  UI_Signal window_signal = (UI_Signal){0};
  {
    ui_node_color_scheme(ui_context.color_scheme.window)
    ui_child_layout_kind(UI_Alignment_Kind_Y)
    {
      UI_Node_Flags window_flags = 0;
      String8 window_text = Sf(ui_context.frame_arena, ""S_FMT"##_window_", S_ARG(text));
      window_signal.node = ui_node_from_string(window_text, window_flags);
      ui_stack_parent_push(window_signal.node);
    }
  }

  UI_Signal title_bar_signal = (UI_Signal){0};
  {
    ui_node_color_scheme(ui_context.color_scheme.title_bar)
    ui_child_layout_kind(UI_Alignment_Kind_X)
    ui_padding_fixed(2)
    ui_size_kind_x(UI_Size_Kind_Relative) ui_size_relative_x(1)
    ui_size_kind_y(UI_Size_Kind_Relative) ui_size_relative_y(0.08)
    {
      UI_Node_Flags title_bar_flags = UI_Node_Flags_Mouse_Clickable |
                                      UI_Node_Flags_Hoverable       |
                                      UI_Node_Flags_Draggable       |
                                      UI_Node_Flags_Text_Display    |
                                      UI_Node_Flags_Text_Center_Y;
      String8 window_title_bar_text = Sf(ui_context.frame_arena, ""S_FMT"##_title_bar_", S_ARG(text));
      title_bar_signal.node = ui_node_from_string(window_title_bar_text, title_bar_flags);
    }
  }
}

function void
ui_window_end()
{
  UI_Node* node = ui_stack_parent_pop();
  Vec2f32 offset = {0};
  if (ui_find_first_drag_offset(node, &offset))
  {
    ui_apply_drag_offset(node, offset);
  }
  ui_update_tree_nodes(node);
}
This makes us push the window context to the stack as a parent of all nodes created in between the start and end. As we've seen before, this is another great opportunity to make use of the Defer macro, where we all the nodes called inside the Defer macro scope, will be children of the window:
ui_begin();
ui_top_left(vec2f32(200,200))
ui_size_fixed_x(200) ui_size_fixed_y(200)
ui_window(S("Test Window"))
{
  ui_padding_fixed(5)
  ui_row(S("Test Row"), 100)
  {
    ui_label(S("Label"));
    ui_button(S("Button 1"));
    ui_checkbox(S("Checkbox a"), &a);
  }
  ui_padding_fixed(5)
  ui_column(S("Test column"), 200)
  {
    ui_label(S("More checkboxes"));
    ui_checkbox(S("Checkbox b"), &b);
  }
}
ui_end();
My implementation of this system can be found at: fz_ui. Being a prototype, this is a rough implementation. There are many missing features and some bugs. But overall, I'm happy with the results and I will continue to iterate on similar systems in other projects.